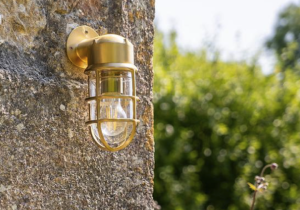
Vintage Brass Shell Wall Lamp: Bathroom Waterproof
So, you’re wondering if a “Vintage Brass Shell Wall Lamp” can actually be waterproof enough for a bathroom? The short answer is: probably not as-is, and definitely not without careful consideration and potentially some modifications. While vintage brass offers a beautiful aesthetic, its inherent design often predates modern bathroom safety standards. You’ll need to look for specific IP ratings or be prepared for some DIY waterproofing if you’re set on that vintage look.
Bathrooms and electricity are a tricky combination, as we all know. The main concern isn’t just a splash, but the continuous presence of moisture and steam. Over time, this moisture can ingress into light fixtures, causing corrosion, short circuits, and even electric shock. That’s why dedicated bathroom lighting is designed with specific protections in mind.
Understanding IP Ratings (Ingress Protection)
This is the big one when it comes to any fixture near water. An IP rating tells you how well an enclosure protects against solids (dust, debris) and liquids (water). It’s shown as “IP” followed by two numbers.
- First Digit (Solids): Ranges from 0 (no protection) to 6 (dust tight).
- Second Digit (Liquids): Ranges from 0 (no protection) to 9K (high-pressure, high-temperature jets).
For bathroom zones, the second digit is crucial. You’ll often see recommendations like IP44, IP65, or even IP67 depending on how close the fixture is to a water source.
The Zones of a Bathroom
Bathroom safety codes typically break the room into different “zones” based on proximity to water sources.
- Zone 0: Inside the bathtub or shower tray itself. Requires very low voltage (Max 12V AC or 30V DC) and a minimum IPX7 rating (protected against immersion).
- Zone 1: Directly above the bathtub or shower, up to 2.25m from the floor. Requires a minimum IPX4 rating (splash-proof). Low voltage is generally recommended here too.
- Zone 2: Area 0.6m outside the perimeter of Zone 1, and 0.6m around the wash basin, up to 2.25m from the floor. Also requires a minimum IPX4 rating.
- Outside Zones: Anywhere beyond Zone 2. A general IP20 rating is usually sufficient, but IP44 is often recommended for added peace of mind due to general room humidity.
A vintage brass shell lamp, unless explicitly modified and rated, almost certainly won’t meet Zone 0 or 1 requirements. Zone 2 might be possible with a good IP rating, and “outside zones” are the most likely place for it if it has no specific water protection.
Why “Vintage Brass Shell Lamp” Isn’t Inherently Waterproof
When we talk about “vintage,” we’re generally talking about older designs that weren’t necessarily created with modern bathroom waterproofing in mind.
Original Design Intent
Many older brass lamps were designed for dry environments – living rooms, hallways, bedrooms. Their construction often involved:
- Openings: Gaps where the wire enters the fixture, between the shade and the base, or where decorative elements join. These are perfect entry points for moisture.
- Basic Gaskets: If any gaskets were present, they were likely simple rubber or cork that would have degraded over decades, losing their sealing ability.
- Lack of Internal Sealing: The internal wiring and electrical connections were rarely fully enclosed or potted to resist moisture.
- Uncoated Brass: While brass itself is somewhat corrosion-resistant, unlacquered brass will naturally tarnish. Moisture accelerates this process, and repeated moisture can lead to a type of corrosion known as “dezincification” in certain brass alloys, compromising its structural integrity.
The “Shell” Aspect
The “shell” in “Vintage Brass Shell Wall Lamp” likely refers to the design – perhaps a scallop, clam, or other marine-inspired shape. While this adds to the aesthetic, it doesn’t automatically mean it’s designed for a wet environment. In fact, intricate shell designs might introduce more seams and crevices where water can collect or seep in, unless meticulously sealed.
Assessing Your Specific Vintage Lamp’s Potential
Before you even think about installing it, you need to thoroughly inspect the lamp itself.
Close Examination for Existing Features
- Labels/Markings: Look for any electrical certification labels (UL, CE, etc.) or an IP rating. It’s highly unlikely a truly vintage lamp will have a modern IP rating unless it was specially designed for marine use or a specific application.
- Sealing Elements: Are there any rubber gaskets around the bulb socket, where the fixture meets the wall, or around any glass/plastic diffuser? If so, check their condition. They might be brittle, cracked, or completely missing.
- Construction Method: How is it put together? Screws? Soldering? Are there obvious gaps or seams between components?
Wiring and Electrical Components
- Wire Insulation: Vintage wiring insulation can be brittle, cracked, or even fabric-based. This is a major safety concern in any environment, let alone a wet one. It would definitely need replacing with modern, heat-resistant, and moisture-resistant wiring.
- Bulb Socket: Is it a porcelain socket or plastic? Either way, you’ll need to assess its condition for any cracks or corrosion. Modern ceramic sockets with good internal wiring connections are preferred.
- Grounding: Does the fixture have a provision for proper grounding? Many older fixtures might only have two wires (hot and neutral) and lack a dedicated ground wire connection. This is non-negotiable for bathroom safety – it must be properly grounded.
Making a Vintage Lamp “Bathroom Ready” (If Possible)
This is where the practical, hands-on part comes in. If you’re not comfortable with electrical work, please consult a qualified electrician. Attempting these modifications without proper knowledge can be dangerous.
Rewiring is Almost Always Necessary
- Modern Wire: Replace all internal wiring with new, appropriately gauged electrical wire that is rated for household AC current and has heat and moisture-resistant insulation. Always ensure proper color coding (e.g., black/brown for hot, white/blue for neutral, green/yellow for ground).
- Grounding: If the fixture lacks a grounding wire, you’ll need to ensure the metal body of the lamp can be properly grounded. This usually involves connecting a ground wire from your home’s electrical system to a sturdy, unpainted metal part of the fixture’s base.
Adding or Replacing Gaskets and Seals
- Silicone Gaskets: For any areas where moisture might penetrate – around the backplate that meets the wall, around a glass or plastic diffuser, or around the bulb socket – you can carefully cut and install silicone gaskets. These are resistant to moisture and higher temperatures.
- Silicone Caulk: Use a high-quality, mold-resistant silicone caulk to seal any very small gaps or seams on the exterior of the fixture, but be mindful not to block ventilation if the fixture generates a lot of heat. Caulk can also be used around the base where the fixture meets the wall.
- Heat Shrink Tubing: For internal wire connections, robust heat shrink tubing can provide an additional layer of insulation and moisture protection over soldered joints.
Encasing or Protecting Internal Components
- Potting Compound: For critical internal electrical connections that are difficult to seal otherwise, electronic potting compound (a resin that hardens) can be used to encapsulate them, creating a solid, waterproof barrier. This is a more advanced technique.
- Waterproof Sockets: Consider replacing the existing bulb socket with a modern, waterproof or moisture-resistant socket if practical and compatible with the lamp’s design.
Choosing the Right Location Within the Bathroom
Even with modifications, a truly waterproof (IP65+) rating is hard to achieve with a vintage fixture. Therefore, placement is crucial.
- Outside Zones Only: The safest bet, even after modifications, is to place your vintage brass lamp in an “outside zone” where splashing is highly unlikely – perhaps high up on a wall, away from the immediate vicinity of the shower, tub, or sink. Ideally, well over 0.6m away from any water source horizontally, and above 2.25m vertically.
- Consider Ventilation: A well-ventilated bathroom helps reduce overall humidity, which lessens the burden on your fixture’s waterproofing efforts. Use an exhaust fan religiously.
Alternatives and Considerations for the Vintage Look
If absolute waterproofing is critical, or the vintage lamp proves too difficult/costly to modify safely, you still have options to achieve that aesthetic.
Buying “Vintage Inspired” but Modern and Rated Fixtures
- New Products, Old Look: Many manufacturers now produce new light fixtures that are designed with a vintage aesthetic but built to modern safety standards and carry appropriate IP ratings. Look for “vintage-style waterproof wall lights” or “maritime IP-rated lighting.” These give you the look without the safety headaches.
- Brass, But Sealed: These modern fixtures will often use solid brass or brass-plated materials, but feature integrated glass diffusers with rubber gaskets and well-sealed electrical compartments.
Using LED Bulbs for Less Heat and More Safety
- Lower Heat Output: LED bulbs generate significantly less heat than traditional incandescent bulbs. This is a huge advantage in a sealed or partially sealed fixture as it reduces stress on internal components and wiring, and also mitigates the risk of overheating.
- Integrated Driver: Many modern LED bulbs have their drivers built-in, simplifying the internal wiring of the fixture compared to older bulb types.
- Damp-Rated LEDs: Some LED bulbs themselves are rated for damp or wet locations, adding an extra layer of protection.
Regular Maintenance and Inspection
Even if you successfully modify your vintage lamp, it’s not a “set it and forget it” situation in a bathroom.
- Annual Check-ups: Inspect the fixture annually. Look for any signs of corrosion, cracked seals, or discoloration around the wiring.
- Test GFCI Outlets: Ensure any bathroom outlets on the same circuit are GFCI (Ground Fault Circuit Interrupter) protected and test them monthly. This won’t protect the light fixture itself from damage, but it will provide critical protection against electric shock if there’s a fault.
- Cleanliness: Regularly wipe down the exterior of the fixture to remove any soap scum or mineral deposits that could accelerate corrosion.
In conclusion, while a “Vintage Brass Shell Wall Lamp” might be visually stunning, its journey to becoming a safe and functional bathroom fixture is likely to be a complex one, requiring considerable effort and expertise. It’s a project for someone truly dedicated to the vintage aesthetic, willing to invest in professional electrical help, or comfortable with detailed DIY modifications, and accepting of placement only in the “outside zones” of the bathroom. For most people, a modern, vintage-inspired, IP-rated alternative will offer a much safer and less stressful solution.